
SEO Guide for Optimizely CMS
Topics

In this article, we aim to outline the minimum amount of consideration required to optimise a page on the FDF website. The aim of all team members is to optimise their posts/pages for search engines, ensuring higher rankings and therefor better visibility for the FDF online.
We will cover the following:
- Creating a new Article Page
- The importance of the URL structure
- The Article image
- Image Alt-text
- The Article title
- Article Summary
- Article Content
- Teaser Content
- The SEO Tab and Social Sharing Content
Publishing a new article on Episerver CMS
In this example we will take a look at a News Update – specifically a News Article – and which parts of the CMS you should take note of when optimising content for SEO.
Please note: Different types of pages may not include all elements or may even include additional elements that will need attention. The general advice outlined in this document should still apply, but please feel free to contact the digital team if you have questions.
The path used to access the correct section was:
FDF Home > FDF Content Container > News > News Articles > 2025 News
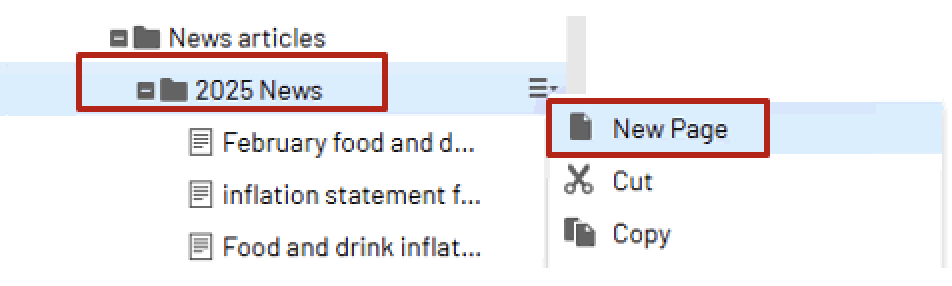
Create a new Article page
Navigate to the News section for where you wish to create your article and click the dropdown menu icon to the right of the section heading. Select the New Page option.
Click the [Article] News Article option:
< insert image >
The CMS will prompt you to add your categories and locations.
Click the plus ‘+’ icon next to each item and select the relevant option.
<insert image>
The Category may be chosen from the Content Type section within the pop-up, as well as the Topics section. For example:
<insert image>
The Location will be chosen from the Locations folder:
<insert image>
Finally, add the Name of your new page. This is for the CMS only, so does not have to be the full article title if you wish to use a shorter name, but for each you can use your article name.
<insert image>
Click Create to create the new page within the CMS.
The Content Tab
With the new page created in the CMS, you should now be looking at the Content Tab. From here you can start to add content and check SEO-related elements such as the page URL for optimisation.
Name in URL
The Name in URL would have been automatically created based on the Name that you gave the new page in the previous step. If, for some reason, you wish this to be different, then you can click the ‘Change’ link and edit the URL.
A few notes as follows:
- Try to keep URLs short.
- Make sure that the URL includes the focus keyword/phrase.
- If you have used a non-alphabetical/numerical character in your article title, this character will not have been added to the URL. So, you may wish to add the name of the removed character to the URL manually.
For example, if the article includes the % character, you may want to add the word ‘percent’ into the URL.
Type Label
As you scroll down the editor, remember to add the Type Label.
Click the three-dot icon ‘…’ next to this field and fins the appropriate Type Label from the Articles Type folder by navigating as follows: the Content type > Articles Type
For example:
<insert image>
This is not a requirement for SEO. Just a reminder to set your Type Label.
Article Image
Scroll down the editor to find the Article Image section. The Article Image is what will appear at the top of your article on the front-end of the website and is also what will be shown within organic search previews (within the SERPs).
Add an Article Image by clicking the green downward arrow icon.
<insert image>
You can either select an image that has already been uploaded to the CMS* or drag & drop and image from your drive.
*Please try to use a unique image for each article. If you do need to use an image that has already been used, use the CMS Image Editor to make a copy of the image so that you can give it a unique name and Alt Tag that is relevant to your article.
<insert image>
Select the image you wish to use and clock OK.
Adding Alt Text (Meta Description)
Click the image in the Content Tab to access the Select Image pop-up.
Access the dropdown menu to the right of the image name and select Edit.
<insert image>
You should now be looking at the image record within the CMS.
- Scroll to view the Image Alt Text
- Insert the desired alt text for the image (we suggest the article title for ease)
- Click Publish.
- Once published, use the ‘Back’ link to navigate back to your article.
If uploading an image from scratch, we suggest the following actions:
- The file name itself should include your desired keyword/phrase. For example: my-key-phrase.jpg
- The image dimensions should be no bigger than 1920 x 1080 pixels and the resolution should be 72dpi.
- If you edit the image size and resolution before uploading to the website, please also use tinypng.com to further optimise the file size before uploading to the website.
Article Image Considerations
- The image should help communicate the topic that is highlighted in the title of the article. Although not an SEO issue, there are implications for the brand in terms of presentation and professionalism, and also user click-through rates.
- You should avoid using image captions for Featured (Article) Images.
Article Title & Date
Input your Article title and Date as required:
<insert image>
Once written, review your article title and ask yourself if there is a more concise way to communicate what you are trying to say. You don’t want to be too wordy. Directness is key along with using the desired keyword/phrase.
Note: The page title, URL and meta title can all be different. They all perform a particular task, so can and should be tweaked accordingly. Just take care to include the focus keyword/phrase in place for all.
Article Summary
Although not absolutely necessary for all articles, it’s great for the reader to see an article summary for longer articles, which gives them an idea of what you will be talking about.
The summary will also contribute to the pages word count and offers you the opportunity to add keywords.
Summaries are also increasingly being referenced by Google’s AI Overview feature in the SERPs as well as other AI tools such as ChatGPT.
<insert image>
Main Content
This is where the full article is inserted, along with additional images that help support the information.
The Main Content area includes a WYSIWYG (What You See Is What You Get) editor to help you format and style your content accordingly.
There is also a handy word-counter located bottom right of the editor.
Main Content Considerations
- 1500 words should be the absolute minimum for any article worthy of consideration by search engines. Some updates will be shorter, and this is unavoidable (Try to include at least 500 words for shorter updates). Ultimately, try to include as much detail as possible so that the article is of real value to the reader and also scans well by search engine bots.
- Use short paragraphs where possible and short sentences to help with the readability of the page.
- Break-up articles with sub-headings. This helps the human reader digest the content, offers the ability to include more keywords, and communicates a clear page structure to search engines.
- Insert images to support your text. Optimise the images as outlined before and suitable keywords in your alt text.
- Use ordered and unordered lists. Never just manually type bullet points or numbered lists. User the correct formatting options within the editor.
- Include internal links to other related article of interest and also to the top-level landing pages, such as the sectors covered in the Business Guidance section of the website.
- Include external links. Support quoted stats and facts with links to the reports from which the information has been gathered. If mentioning a particular company, institution, or governing body, consider adding a link to their website.
When styling text using the editor, use the Formats dropdown to style your headings, and the Numbered List or Bullet List options for creating ordered and unordered lists. (see below)
<insert images>
Teaser Content
This content does not impact the SEO of the page itself but will improve the SEO and click-through rates of the pages that feature the teaser content.
Teaser content can be thought of as on-site meta title & description. Ideally, a concise title that is engaging for the reader and encourages clicks, along with a short summary that does the same.
<insert image>
Teaser Image
You can use the same image and alt text that was used for the Article Image here unless for some reason this is not appropriate.
<isert image>
SEO Tab
This is where you will enter your meta title, description and social sharing content.
<insert image>
Meta Data Settings
Remember the following:
- SEO Title Length: Ensure the SEO title is within the recommended character length (around 50–60 characters).
- Meta Description Length: Ensure the meta description is within the recommended character length (around 120–155 characters).
Social Sharing Content
For the Social Sharing Title and Description, you can use the same content that was used for the meta data, unless for some reason you want to change this.
<insert image>
Again, for the Social Sharing Image, you can use the same image and alt text that was used for the Article Image here unless for some reason this is not appropriate.
<insert image>
When you have finished, remember to click ‘Publish’ to make sure your changes are pushed live.
Testing link styles